
Getting Flexy - Flex quick start project with Ant build script

download

Flex has open up endless possibilities to web designers and developers around the world. Since Flex has been around for a while now ,there are tremendous amount of resources available on the subject. Most of these guides and tutorials are base on Flex builder.

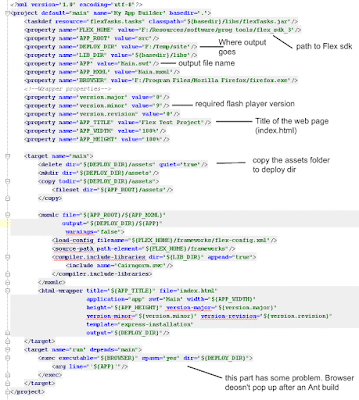
The above code is a starting point to your Flex project. It contains an Ant build file which will compile the source files to a swf file and create html wrappers for you. You have to edit the build.xml file inside the extracted "flexy" directory.


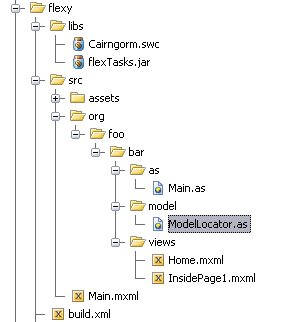
This is how the project is structured. The following image will give you a guild lines to edit the build files.


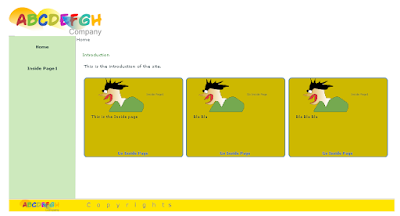
If you setup Ant, Flex Sdk and change the build.xml file you will be able to generate something like this.

Comments

Anonymous said…
This comment has been removed by a blog administrator.
john said…

Hi, Great.. Tutorial is just awesome..It is really helpful for a newbie like me..
I am a regular follower of your blog. Really very informative post you shared here.
Kindly keep blogging. If anyone wants to become a Front end developer learn from Javascript Training in Chennai .
or Javascript Training in Chennai.
Nowadays JavaScript has tons of job opportunities on various vertical industry. ES6 Training in Chennai

Popular posts from this blog

Overriding default look and feel of GREG - 5.3.0

Following list explains what are the best approach for different use cases. 1 ) - You created a new asset type, and you need to change the look and feel of the details page in the listing page just for that new asset type. To create a new asset type you need to login to the carbon console (username:admin, password:admin) https:// :9443/carbon/ Navigate to Extensions > Configure > Artifacts Click "Add new Artifact" link at the bottom of the page. By default in the "Generic Artifact" area "application" asset type is loaded. Note the shortName="applications" in the root node. "applications" is the name of the asset type. Browse in to /repository/deployment/server/jaggeryapps/store/extensions/assets Create a folder with name "applications"    Now we can override the files in /repository/deployment/server/jaggeryapps/store/extensions/app/greg-store-defaults   Since we are overriding the details page we need to...

Projecting HTML Elements on a circle using Javascript

Recently I wonted to create a tree control with a different approach. The requirement was to represent a node tree with main node on the circle center and it's child nodes projected on a circle around it. This is what i wanted. My solution has 5 files prototype.js This is a handy javascript framework. You can download the latest version from there website ( www.prototypejs.org/download ). I am using this to simply handle the onload event in the page. circle.html script.js node-main-left.gif node-sub-left.gif The circle.html, prototype.js and the script.js files are in the root folder and the two images are inside a folder named “images”. This is how the html file looks(circle.html). <html> <head> <script src="prototype.js" type="text/javascript"></script> <script src="script.js" type="text/javascript"></script> <script language="javascript" xml:space...

Simple client side validation library

  Client side validation has never been easy.. Include jQuery and the validator.js < script src = " http://code.jquery.com/jquery-1.11.3.min.js " ></ script > < script src = " ../validate.js " ></ script > Simple validation < form id = " myForm " > < label >User Name < span class = " red-star " >*</ span > </ label > < input type = " text " name = " userName " class = " validate-required " /> < br /> < label >Password < span class = " red-star " >*</ span ></ label > < input type = " password " name = " password " class = " validate-required " /> < br /> < input type = " submit " value = " Login " /> </ form > ...